Debian is my favorite distro, but I usually don’t recommend it as a desktop environment. LMDE is a nice alternative for Debian fans who want to use Debian as their everyday home/work desktop environment. Unlike Ubuntu, it’s a pure Debian installation (basically Debian Testing), but it uses a more agile and up to date package repository. Many software packages which are known to be a hassle on Debian desktops run seamlessly out of the box. Who hasn’t cried out “Come on Debian, who needs Iceweasel. I want the latest version of Firefox with Flash running”. LMDE goes a little bit along the line “I like to have my cake and eat it too”.
One thing that bothered me tough, is that the LMDE installer didn’t offer any options to encrypt the partition(s). I found a howto by hashstat Howto install LMDE with LVM (with or without encryption). However I didn’t like the idea of transforming the Live CD into the final system.
The main part of the solution I describe here is heavily based on hashstat howto. However, we install LMDE onto a virtual machine and then transfer it onto the encrypted partition. There are three steps:
- Install LMDE on a VirtualBox VM
- Prepare encrypted disk
- Transfer LMDE from the virtual machine to the real machine
In my case, I installed LMDE on a virtual machine on my notebook. If you don’t have an extra computer, it might also be possible to install LMDE on a flash drive and use it later to transfer it to your real machine. However I didn’t try that. The virtual machine method was fitting for me, since I had LMDE already installed on it for a test drive.
Step 1: Install LMDE on a VirtualBox VM
I was using Virtual Box. The step is pretty similar to any other VM (e.g. VMWare).
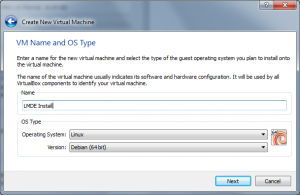
So let’s create a new virtual machine. Select Linux / Debian (or Debian 64bit if you are going to run a 64bit LMDE) as the guest system. I gave it 1GB of RAM and the default 8GB disk space.
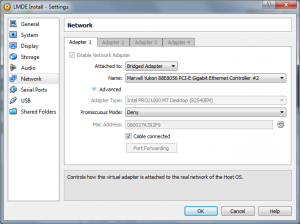
In the settings I changed the network adapter to “Bridged” mode.
When you start the VM for the first time, it asks for a boot media. Select the LMDE image (e.g. linuxmint-debian-201012-gnome-dvd-amd64.iso). The Rest is straight forward. Install LMDE as you would do on a stand alone PC. You don’t need to create different partitions for /boot or /home as you would do it on a real install, since we transfer the whole file system later on anyway.
Make sure that ssh is installed, so we can remotely copy everything over the network onto our real machine later on.
sudo -s
apt-get update
apt-get install ssh
Give root a password, so we can log into the virtual machine remotely as root:
passwd root
Test to see if we can log into the machine as root over ssh:
ssh root@localhost
It should ask you for your password and let you log in.
Step 2: Prepare encrypted disk
Now boot into the LMDE Live DVD on your machine where you want LMDE to be installed. Open a shell and install some additional packages that we need to create an encrypted partition.
sudo -s
apt-get update
apt-get install lvm2 squashfs-tools cryptsetup
Create the partitions
On my system the drive was on /dev/sda. So from here on I use it as the disk device. Please replace it with the device that is on your system (e.g. /dev/hda). We need to create the partitions from scratch. We can use gparted for that purpose.
gparted /dev/sda
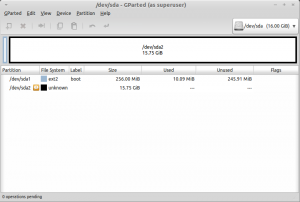
Create a new partition table from the Device Menu. Then add a 256MB boot partition at the beginning of the drive. The rest of the drive is filled with a single unformated partition. This will contain the encrypted later on. In case you have already had data on your disk, you might need to delete preexisting partitions. Here is a screenshot of the final result.
Now we can encrypt the partition. It’s also a good idea to fill the partition with some random data to counteract certain key recovery techniques.
dd if=/dev/urandom of=/dev/sda2 bs=1M
cryptsetup luksFormat /dev/sda2
cryptsetup luksOpen /dev/sda2 sda2_crypt
VOLUME=/dev/mapper/sda2_crypt
The first cryptsetup command creates the encryption. It will ask you for a password. Never forget it! The second command opens the encrypted device at /dev/mapper/sda2_crypt.
In the next step we create several LVM logical volumes. You can think of a logical volume as some sort of partition that lives inside the encrypted partition. We also create the swap partition as a logical volume. That way the swap space is also encrypted.
pvcreate $VOLUME
vgcreate volumes $VOLUME
lvcreate -n lmde -L 10G volumes
lvcreate -n swap -L 2G volumes
lvcreate -n home -L 50G volumes
This will create a logical volume for the root, swap and home filesystem. If you want the last volume to fill the rest of the volume group, just enter a bigger amount then there is actually space left. From the resulting error message, you get the amount of extents left.
Volume group "volumes" has insufficient free space (959 extents): 12800 required.
In my case I had 959 extends left. So I created the last volume by specifying the exact amount of extends:
lvcreate -n home -l 959 volumes
It’s time to create file systems on our freshly created volumes. The boot partition will be formatted with ext2. root and home are formated with a journaling file system (e.g. ext4).
mkswap -L swap /dev/volumes/swap
swapon /dev/volumes/swap
mkfs -t ext2 -L boot /dev/sda1
mkfs -t ext4 -L root -j /dev/volumes/lmde
mkfs -t ext4 -L home -j /dev/volumes/home
Step 3: Transfer LMDE from the virtual machine to the real machine
During the following steps, we copy all the data from the LMDE installed on the virtual machine onto our real system.
In order to access our new file system, we need to mount it.
mount /dev/volumes/lmde /mnt
mkdir /mnt/boot /mnt/home
mount /dev/sda1 /mnt/boot
mount /dev/volumes/home /mnt/home
Now we are ready to transfer the LMDE installation. We are going to use rsync over ssh to copy all the data from the virtual machine. Replace remotehost with the IP address of the virtual machine. You can use ifconfig on the VM to find out it’s IP.
rsync -avz --exclude=proc --exclude=sys --exclude=dev/pts -e ssh root@remotehost:/ /mnt
We need to edit a few files to reflect the physical properties of our machine.
Edit /mnt/etc/crypttab to set your encrypted device:
sda2_crypt /dev/sda2 none luks
Edit /mnt/etc/fstab to reflect your devices. Basically delete everything except the lines for proc und cdrom and add the mount points for / /boot /home and the swap space.
# <file system> <mount point>   <type>  <options>       <dump>  <pass>
proc            /proc           proc    defaults        0       0
LABEL=boot      /boot           ext2    defaults        0       2
/dev/volumes/lmde /             ext4    errors=remount-ro 0     1
/dev/volumes/home /home         ext4    defaults        0       2
/dev/volumes/swap none          swap    sw              0       0
/dev/scd0       /media/cdrom0   udf,iso9660 user,noauto 0       0
Copy the current resolv.conf to the new system. That way we have a name server defined and can access the internet for a package update later on.
cp /etc/resolv.conf /mnt/etc/
Now it’s time to chroot into the new file system. chroot changes the apparent root directory for the current running process. That way we can work on our new system as if it’d be the current file system, even though it isn’t. We also need to mount some special devices in order for the devices and kernel files to be accessible.
cp /etc/resolv.conf /mnt/etc/
mount --bind /dev /mnt/dev
chroot /mnt
mkdir /sys
mkdir /proc
mount -t sysfs none /sys
mount -t proc none /proc
mount -t devpts none /dev/pts
At first, we install some additional packages, so our system is able to access the encrypted partition and the volumes during the boot process.
apt-get update
apt-get install cryptsetup lvm2
In case you’ll edit /etc/crypttab after installing cryptsetup, you need to run update-initramfs -u in order for the settings to be used during boot time.
Finally we need to install a boot loader. I was using grub which is pretty much standard. Accept the default options. When asked for the GRUB install device, select /dev/sda (or whatever your disk device is).
dpkg-reconfigure grub-pc
At this point we are actually done. But it doesn’t hurt to unmount everything and back out from chroot again.
umount /dev/pts
umount /proc
umount /sys
exit
umount /mnt/dev
umount /mnt/home
umount /mnt/boot
umount /mnt
Let’s make sure everything was written to the file system and reboot.
sync
reboot
If all went well, you will see the GRUB boot loader during start up. Shortly after that, the system will ask you for the password in order to access the encrypted file system. After the boot process has finished, you are ready to use your brand new LMDE on an encrypted drive. Have fun.


17 Comments
My question is in regards to the creation of the logical volumes. Did you actually use a larger drive size for your virtualbox machine? You cannot create a 50G partition on the size drive you show in gparted. Or am I missing something?
Thanks
Hey Tyler. Thanks for your comment.
Yes, I had deliberately chosen the parameter too large. That way I got an error message which told me how many extends were really available. Then I created the "home" volume with the amount of extends that were actually left (in my case 959 extends which is somewhere between 3 and 4GB). Please reread the paragraphs describing the creation of the logical volumes.
And by the way. You said virtualbox. Don't create the encrypted partition in virtualbox. The virtualbox installation is only a template for the real machine, which is then transferred to the real machine with rsync. The encrypted partition (in my case /dev/sda2) has to go on your real machine. That's where you want to end up having an encrypted LMDE. In my case, the virtual drive in virtualbox was only 8GB. The size is irrelevant. It only needs to be big enough to hold the initial LMDE installation (a couple gigs will do I guess).
Nice tutorial. A good tip is to use LVM parameter -l+100%FREE instead of -L. That way you don't need to bother with space stuff.
Very interesting. This suggest me another solution for which I would like to have your advice. Suppose you don't have any other OS. As a disk can hold four primary partitions, do you think it would work, first installing the system on 3 primary partitions (/boot, swap and /), then install an encrypted lvm on the fourth, and transfer to that volumes as you did for the VM?
Yeah. Very interesting idea. I have never tried it that way, but I don't see why it shouldn't work. Although the disadvantage is, that not all of your hard drive space is used at the end.
You don't even necessarily need to separate /boot and /. And if you have enough ram, you don't need swap either. So you would only need two partitions.
Maybe you could even create the initial partition at the end of the drive. That way it would be easier to enlarge the resulting encrypted partition across the whole drive. In the old days, there was a limitation that a boot partition could not be after a certain cylinder of the drive. I am not sure if this still applies nowadays. Also, I have never enlarged an encrypted partition. I am not sure if it is as easy as with a normal partition.
I just followed through with this, except I did something ridiculous. (Your guide worked great, by the way)
I have 16GB RAM. I thought, why not boot from my LMDE DVD, install virtualbox, create a "virtual hard disk" (which will be stored temporarily in RAM since I'm booted from DVD), give the virtual machine access to the physical drive (which, incidentally, i'm booted from)...
and from there, I followed everything you said, and it worked like a charm.
doing it this way might be significantly faster if you have the RAM to spare.
Not bad, Dylan. I am sure that worked out a hell of a lot faster.
Aaaaaaand this is why LVM support should be added to the installer.
Good tutorial though. Easy to understand for the most part.
Hey Norbert, most of the steps work and it is a good article, but I faced the following issues:
1# Running lvcreate -n lmde -L 10G volumes throws an error:
Aborting. Failed to wipe start of new LV
The Solution was to use lvcreate -Z n -n lmde -L 10G
2# Running mkswap -L swap /dev/volumes/swap throws an error: Device not found (or something like that...)
That is because /dev/volumes/swap really doesn't exist, I dig and found that the logical partitions were all in /dev/mapper/volumes-
The Solution was to use mkswap -L swap /dev/mapper/volumes-swap
The same thing had to be done to whatever was pointing to /dev/volumes/*
IMPORTANT: On the step to edit /mnt/etc/fstab you must follow the same rule /dev/mapper/volumes-
It should look like this:
#
proc /proc proc defaults 0 0
LABEL=boot /boot ext2 defaults 0 2
/dev/mapper/volumes-lmde / ext4 errors=remount-ro 0 1
/dev/mapper/volumes-home /home ext4 defaults 0 2
/dev/mapper/volumes-swap none swap sw 0 0
/dev/scd0 /media/cdrom0 udf,iso9660 user,noauto 0 0
I don't know if this would cause any problems, but for now it works just fine for me.
Thanks for the article, hope my comments help other people.
I haven't done this in a while. Maybe something changed in recent releases. Thanks for the info.
If you use lvcreate -Z n and don't zero the volume lvcreate warns that trying to mount an unzeroed logical volume can cause the system to hang. Is there any other way? So zeroing the volume? I wouldn't like to get an unstable system.
When I try to rsync I don't get prompted for a password and get an error:
ssh: connect to host 10.0.2.15 port 22: Connection timed out
rsync: connection unexpectedly closed (0 bytes received so far) [Receiver]
rsync error: error in rsync protocol data stream (code 12) at io.c(605) [Receiver=3.0.9]
OK, sorry about that last comment, I had my Virtual Machine network set up wrongly, it works now!
This is my version updated from http://forums.linuxmint.com/viewtopic.php?f=189&t=83763
''
CRYPT_DEV=sda10_crypt
CRYPT_PART=/dev/sda10
VLM_GRP=volumes
VLM_ROOT=lmde
VLM_HOME=home
VLM_SWAP=swap
BOOT_DEV=/dev/sda11
#ip address of virtualbox machine
VB_IP=192.168.1.135
export CRYPT_DEV CRYPT_PART VLM_GRP VLM_ROOT VLM_HOME VLM_SWAP BOOT_DEV VB_IP
cryptsetup luksFormat $CRYPT_PART
cryptsetup luksOpen $CRYPT_PART $CRYPT_DEV
VOLUME=/dev/mapper/$CRYPT_DEV
pvcreate $VOLUME
vgscan
vgcreate $VLM_GRP $VOLUME
lvcreate -n $VLM_ROOT -L 26G $VLM_GRP
lvcreate -n $VLM_SWAP -L 2G $VLM_GRP
lvcreate -n $VLM_HOME -L 50G $VLM_GRP
lvcreate -n $VLM_HOME -l 4423 $VLM_GRP
lvscan
mkswap -L $VLM_SWAP /dev/$VLM_GRP/$VLM_SWAP
swapon /dev/$VLM_GRP/$VLM_SWAP
mkfs -t ext2 -L LMB $BOOT_DEV
mkfs -t ext4 -L LMR -j /dev/$VLM_GRP/$VLM_ROOT
mkfs -t ext4 -L LMH -j /dev/$VLM_GRP/$VLM_HOME
mkdir /mnt/$VLM_ROOT
mount /dev/$VLM_GRP/$VLM_ROOT /mnt/$VLM_ROOT
mkdir /mnt/$VLM_ROOT/boot /mnt/$VLM_ROOT/$VLM_HOME
mount $BOOT_DEV /mnt/$VLM_ROOT/boot
mount /dev/$VLM_GRP/$VLM_HOME /mnt/$VLM_ROOT/$VLM_HOME
rsync -avz --exclude=proc --exclude=sys --exclude=dev/pts -e ssh root@$VB_IP:/ /mnt/$VLM_ROOT
''
And edit crypttab
''
blkid $CRYPT_PART
nano /mnt/$VLM_ROOT/etc/crypttab
''
''
#CRYPT_DEV UUID=544a0dfd-a24e-40c7-8f83-c99348945c45 none luks,tries=10,lvm=$VLM_GRP-$VLM_ROOT
sda10_crypt UUID=544a0dfd-a24e-40c7-8f83-c99348945c45 none luks,tries=10,lvm=volumes-lmde
#/dev/sda10 uuid=544a0dfd-a24e-40c7-8f83-c99348945c45
''
and edit fstab
''
nano /mnt/$VLM_ROOT/etc/fstab
''
add under proc line and if aplicable cdrom line
''
LABEL=LMB /boot ext2 defaults 0 2
#/dev/$VLM_GRP/$VLM_ROOT / ext4 errors=remount-ro 0 1
/dev/volumes/lmde / ext4 errors=remount-ro 0 1
#/dev/$VLM_GRP/$VLM_HOME /$VLM_HOME ext4 defaults 0 2
/dev/volumes/home /home ext4 defaults 0 2
#/dev/$VLM_GRP/$VLM_SWAP none $VLM_SWAP sw 0 0
/dev/volumes/swap none $VLM_SWAP sw 0 0
''
ready chroot
''
cp /etc/resolv.conf /mnt/$VLM_ROOT/etc/
mount --bind /dev /mnt/$VLM_ROOT/dev
mkdir /mnt/$VLM_ROOT/sys
mkdir /mnt/$VLM_ROOT/proc
chroot /mnt/$VLM_ROOT
''
and very important part - edit modules in /etc/initramfs-tools/
''
uvesafb mode_option=1024x768-24 mtrr=3 scroll=ywrap
dm-crypt
dm-mod
xts
aes
aes-cbc-essiv
aes-x86_64
sha256_generic
sha512_generic
lvm
ahci
usbcore
uhci_hcd
ehci_hcd
usbhid
''
edit /etc/initramfs-tools/initramfs.conf and add(or change) KEYMAP=y
according to UnrealMiniMe in http://forums.linuxmint.com/viewtopic.php?f=189&t=83763
it is necessary to run following commands to actualy find root after succesfull decryption of sda10_crypt
''
cp /usr/share/initramfs-tools/scripts/local-top/cryptroot /etc/initramfs-tools/scripts/local-top/cryptroot
cp /usr/share/initramfs-tools/scripts/local-top/cryptroot /etc/initramfs-tools/scripts/local-top/cryptroot
update-initramfs -u
update-grub
''
after exit from chroot umount all partitions
''
umount /mnt/$VLM_ROOT/dev
umount /mnt/$VLM_ROOT/proc
umount /mnt/$VLM_ROOT/sys
umount /mnt/$VLM_ROOT/$VLM_HOME
umount /mnt/$VLM_ROOT/boot
umount /mnt/$VLM_ROOT
sync
''
Thanks Pavol, for sharing your discoveries here. I haven't looked at it in detail yet. But next time I need it I'll try your way.
this is basicaly just modified howto for encryption single partition on exisitng system to install another system alongside main system. I will try to post pastebin copy of my local wiki where i keep my configuration an installation knowhow, because as of now i spotted several mistakes and missing explanation, so dont take it literaly, use this article as main source and my added commands in case of errors or problems (mainly modules update and cryptroot tools for initramfs which caused me problems - 12hours of endless trying:) )
Be aware that dm-crypt uses default english keyboard labeled 'C' and special sigbs like @,# must be typed using right alt (at least in my case)